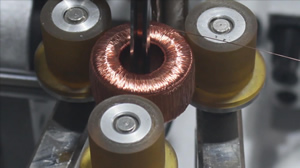
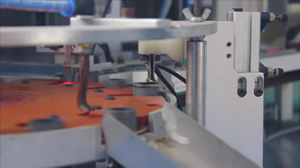
How To Use Rotary Laser Level: Step by Step Guide for Beginners & Experts

Author:

Published:

Updated:

How to Use Rotary Laser Level

Affiliate Disclaimer

As an affiliate, we may earn a commission from qualifying purchases. We get commissions for purchases made through links on this website from Amazon and other third parties.

A rotary laser level is one of the most valuable tools in your toolbox. They are used to level floors, walls, slabs, and even landscape features. Whether you’re a professional or a DIY expert, you can always benefit from knowing how to use a rotary laser level.

This guide provides a basic introduction to the rotary laser level and explains its use in various construction and engineering applications. We also offer a practical method for setting up the device for first-time users and details on how to operate it confidently.

What is a Rotary Laser?

How To Use Rotary Laser Level

A rotary laser is a device that can be used to cut, engrave, or etch materials. The laser beam is scanned in a circular motion to produce varying widths and depths lines.

The Rotary Laser works by focusing the light from a high-intensity light source onto the material being worked on at an angle, reflecting onto the original light source where it is collected and focused again.

How to Use Rotary Laser Level?

A rotary laser level is preferred for construction and repair tasks such as leveling floors, walls, and surface heights. Rotary laser levels are used for these purposes because they’re portable, easy to use, and accurate. Once you place the laser level on an object to be measured, the dial automatically tells you how dark it is below your objective. The beauty of using a rotary laser level is that you can see what’s under your object before making any adjustments or doing any measuring.

There are six steps to that you can use the device and will be discussed below:

  1. Measure the height of the workpiece and mark it with a pencil or a piece of tape.
  2. Place the base plate on top of the marking and align it to the level line with all four leveling screws set at zero.
  3. Align one side of the rotary arm with your marking, keeping in mind that this is done by adjusting each screw individually until you hear a “click” when moving up or down, then tighten all four screws simultaneously.
  4. Lower the rotary arm into position using its built-in handle, making sure that both ends are level and parallel to each other before tightening all four leveling screws again.
  5. Place the laser unit onto your rotary arm and make sure it fits snugly over both ends of your rotary arm. Ensure that both ends align with the laser unit when placed over them.
  6. Level and center your rotary arm onto the laser by adjusting each screw separately. Tighten all four screws simultaneously after achieving proper alignment between the laser’s body and both ends of the rotary arm.

8 Benefits Of Using A Rotary Laser Level

Benefits Of Using A Rotary Laser Level

The rotary laser level has many advantages over other levels. One of the significant advantages of using a rotary laser level is that it can do tasks very quickly and efficiently.

  1. It is easy to use and can be operated with one hand.
  2. The level provides a 360-degree view of the work area, which makes it easier to see what you are doing at all times.
  3. It has an LED light that shines on the work surface, making it easier to see where you are working in low light conditions.
  4. The laser helps cut through wood or sheet metal materials with ease, making it ideal for carpentry projects and other similar tasks.
  5. It uses three AA batteries that last for about 10 hours of continuous use, so you won’t have to worry about your project going unfinished due to a dead battery or having no power when needed most.
  6. It comes with a measuring tape that can be easily attached by clipping onto the side of the unit without any tools required whatsoever – make sure your material is square before using this feature!
  7. You can also attach straight edge and clamp attachments that allow you to cut perfect 45-degree angles when using this tool on wooden surfaces or other materials such as drywall sheets or plywood pieces without any trouble at all!
  8. A high-quality rotary laser level like this one will provide years of reliable service, ensuring you get top value from your purchase right out of the box!

How to Calibrate a Rotary Laser Level

A rotary laser is best used with a device with its built-in level. This process can be a laser cutter or even another rotary laser.

There are three adjustments to the unit. A trigger adjustment, sensitivity adjuster, and shape adjuster range from mild, moderate, and severe depending on what type of material you plan to use the device.

The first adjustment is the trigger. The general idea behind this element of a rotary laser device is to have approximately one degree of rotation between each pulse on your cutting tool. That means you should strive to get at least 15 pulses per 60mm width without playing in the machine unit itself.

This adjuster can be pulled back or pushed forward depending on whether it must follow strictly with direction changes during printing or not. In addition, if you find yourself having to keep adjusting the laser after each print, you should check your sensitivity adjustments to make sure that it’s at a suitable level for whatever material you are trying to use.

The following trigger is ideal for cutting plastic or soft aluminum and other non-ferrous materials such as wood.

There are 8 steps to calibrate a rotary laser level

  1. Press the ON/OFF button on the power supply. 
  2. Rotate the leveling head until it locks in place. 
  3. Remove any protective plastic from the leveling head. 
  4. Position the black side of the leveling head against a horizontal surface and press firmly. 
  5. Look through one of the windows in the leveling head, then align its center with an object that is not moving or changing shape. 
  6. To level up, move one end of either prism until it’s even with or slightly below (depending on which you need). To level down, do the same but in reverse.
  7. Adjust each end of each prism by turning them 1/8 turn at a time, then recheck alignment before making any further adjustments 
  8. Use your thumb to hold one end of either prism so that it can’t move, then tighten mounting screws on both ends by turning them clockwise 1/4 turn at a time until they’re snug but not tight enough to slip out when you try to loosen them again while holding both prisms still (about 3-5 turns should do it).

How do you test a rotary laser level?

To test your rotary laser level, you will need to set up your projector in front of the target area and make sure that it is on, the lens is aligned correctly, and there are no obstructions in between them.

Next, you will want to calibrate your tool by placing it on a flat surface with white paper or another similar material underneath. You see the projected image and make sure that it’s lined up perfectly. This process will help ensure accuracy when testing your tool for future use.

How do you use a rotary laser level for beginners?

The first thing you need to do is make sure that the laser level is set up correctly. Then, start at one end of the object and line it up with the other end of the object. After that, rotate the laser level 360 degrees around to make sure it’s perfectly aligned.

Final Words:

A rotary laser level is a type of level used to ensure the straightness of a surface. It consists of a small sensor that emits a laser beam and detects its reflection. When the sensor detects the reflected beam, it calculates the angle between the two objects being measured. The signal from this sensor can be used to determine if an objective is straight or not. This type of level is commonly known as rotary laser level or simply as a rotary tool for short. This blog post will explain what the rotary tool does and how you can use it in your daily life.

About the author

5 responses to “How To Use Rotary Laser Level: Step by Step Guide for Beginners & Experts”

  1. […] Using a rotary laser level in the middle of an area can determine whether the ground is too steep. It also helps you measure the level of the foundation. […]

  2. […] travel a greater distance. Also, for outdoor projects, we would recommend utilizing the line and rotary lasers that come with pulse or detector features. Those will be easy to work […]

  3. […] lasers and rotary lasers with detector or pulse features are the right picks for outdoor projects. These work well with long […]

  4. […] to know how to use rotary laser level? Read our […]

Leave a Reply

Your email address will not be published. Required fields are marked *

Latest posts

  • The Ultimate Guide About How To Use Topcon Laser Level Rl H4c

    The Ultimate Guide About How To Use Topcon Laser Level Rl H4c

    Are you ready to take your construction projects to the next level? Do you want a reliable, accurate way to measure and level surfaces? The Topcon Laser Level RL H4C is the perfect tool for the job. In this blog post, we’ll explain How To Use Topcon Laser Level Rl H4c and provide tips on…

    Read more

  • How To Test Electric Fence With Multimeter Step By Step Guide

    How To Test Electric Fence With Multimeter Step By Step Guide

    Are you looking to install an electric fence around your property? Want to make sure it’s working correctly? Testing an electric fence with a multimeter is the best way to ensure it’s functioning properly. In this blog post, we’ll explain How To Test Electric Fence With Multimeter. Read on for all the details! Understanding Electric…

    Read more

  • Do I Need A Laser Level For Tiling? Know The Truth

    Do I Need A Laser Level For Tiling? Know The Truth

    If you’re about to tackle a tiling project, you might be wondering if a laser level is necessary. The answer is yes! Using a laser level will help ensure that your tiles are perfectly aligned and leveled. In this blog post, we’ll look at why you need a laser level for tiling and which one…

    Read more